Deploying Ghost CMS on MicroK8s (Raspberry Pi) with Public Access via Cloudflare Tunnel [Part 1]
![Deploying Ghost CMS on MicroK8s (Raspberry Pi) with Public Access via Cloudflare Tunnel [Part 1]](/content/images/size/w1200/2025/05/Deploy-Ghost-CMS-on-MicroK8s.png)
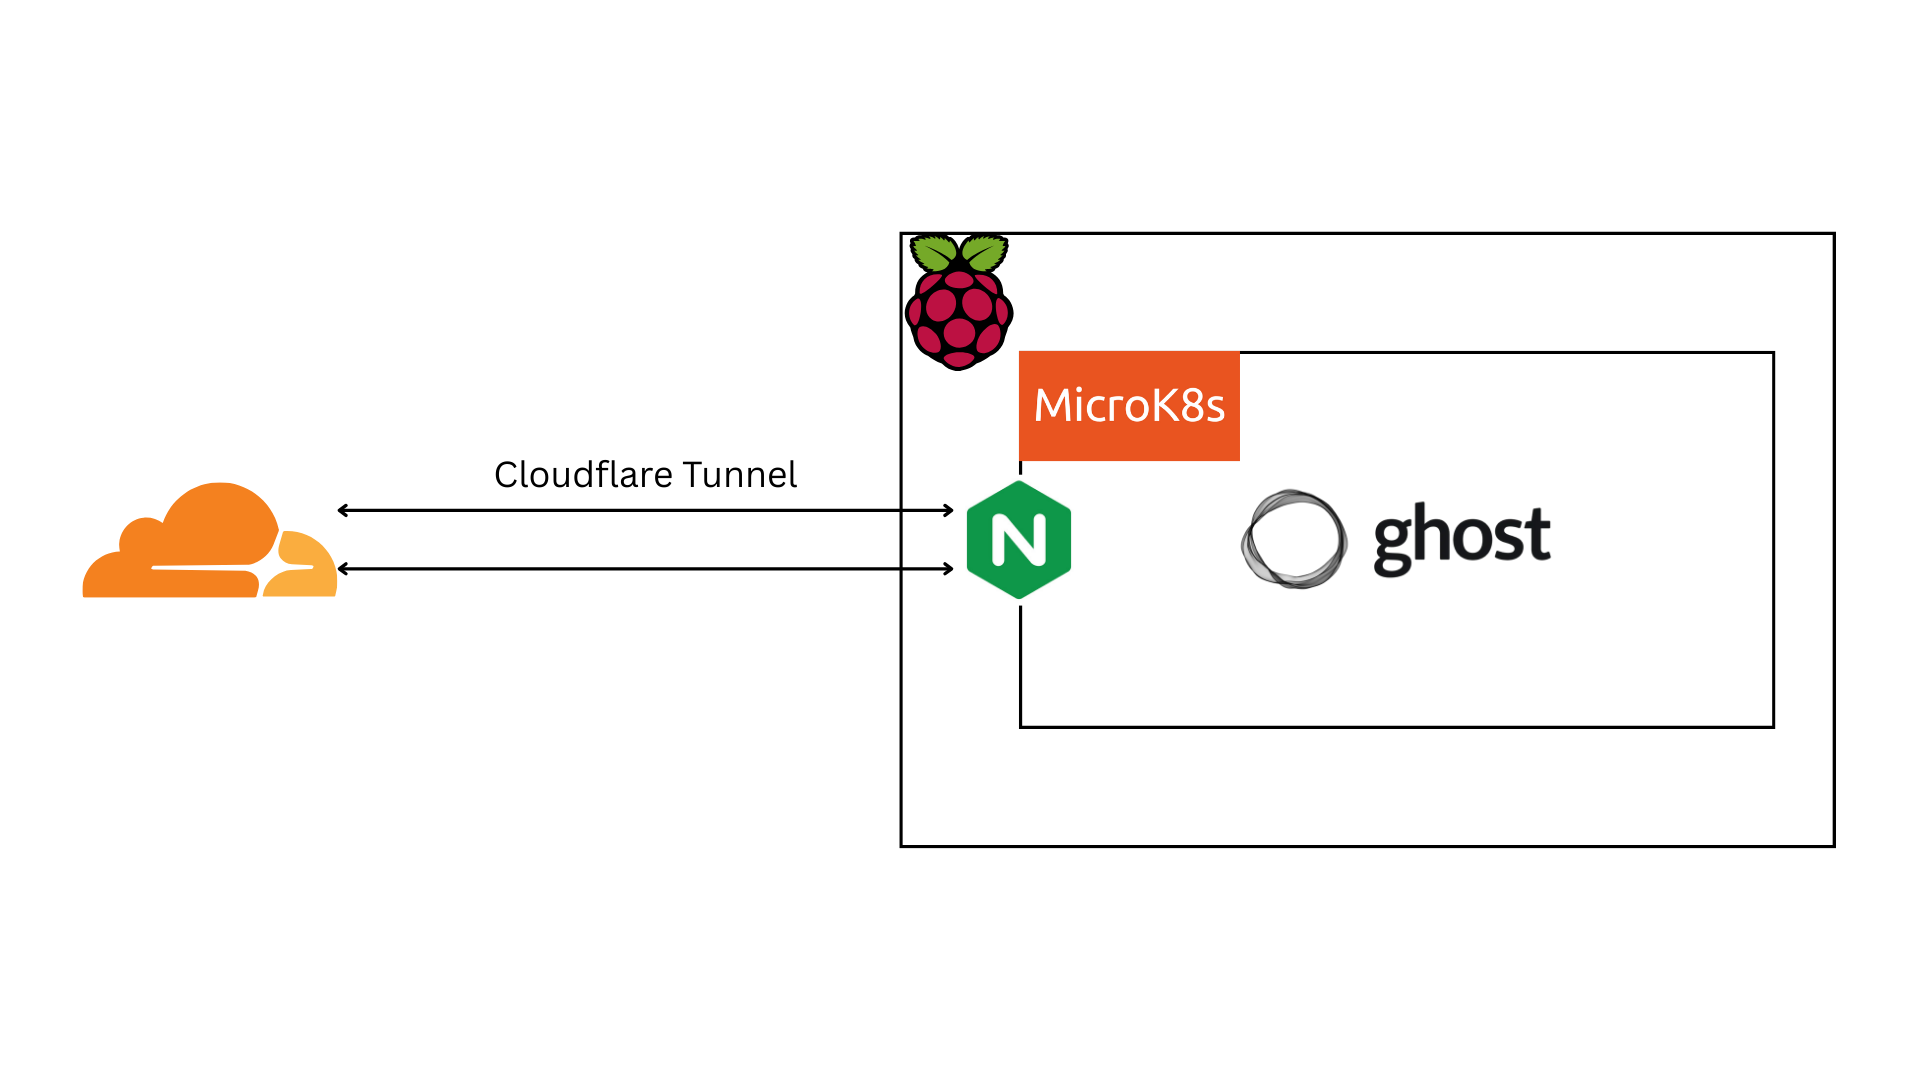
In this project, I'll walk you through how to deploy Ghost CMS on MicroK8s running on a Raspberry Pi and expose it publicly using a Cloudflare Tunnel.
Note: I'll skip microk8s installation part and assume you have basic knowledge of Kubernetes.
Step 1: Enable Necessary MicroK8s Add-ons
First, enable ingress and hostpath-storage in MicroK8s:
microk8s enable ingress hostpath-storageWe will use hostpath-storage for persistence because it’s simple to set up.
Step 2: Create a Persistent Volume Claim
Create a pvc.yaml file to claim storage:
apiVersion: v1
kind: PersistentVolumeClaim
metadata:
  name: ghost-pvc-claim
  namespace: ghost
spec:
  accessModes:
    - ReadWriteOnce
  resources:
    requests:
      storage: 2Gi
Step 3: Create Secrets for Email Configuration
Create a secrets.yaml file to store your email credentials:
apiVersion: v1
kind: Secret
metadata:
  name: ghost-secrets
  namespace: ghost
type: Opaque
stringData:
  EMAIL: "YOUR_EMAIL"
  PASSWORD: "YOUR_PASSWORD"
These secrets will be used for sending emails to subscribers.
Step 4: Deploy Ghost CMS
Create a deployment.yaml file:
apiVersion: apps/v1
kind: Deployment
metadata:
  name: ghost
  namespace: ghost
spec:
  replicas: 1
  selector:
    matchLabels:
      app: ghost
  template:
    metadata:
      labels:
        app: ghost
    spec:
      containers:
        - name: ghost
          image: ghost:latest
          ports:
            - containerPort: 2368
          env:
            - name: url
              value: "yourdomain"
            - name: mail__from
              valueFrom:
                secretKeyRef:
                  name: ghost-secrets
                  key: EMAIL
            - name: mail__transport
              value: "SMTP"
            - name: mail__options__service
              value: "Your Email Service"
            - name: mail__options__auth__user
              valueFrom:
                secretKeyRef:
                  name: ghost-secrets
                  key: EMAIL
            - name: mail__options__auth__pass
              valueFrom:
                secretKeyRef:
                  name: ghost-secrets
                  key: PASSWORD
          volumeMounts:
            - name: ghost-persistent-storage
              mountPath: /var/lib/ghost/content
      volumes:
        - name: ghost-persistent-storage
          persistentVolumeClaim:
            claimName: ghost-pvc-claim
---
apiVersion: v1
kind: Service
metadata:
  name: ghost-service
  namespace: ghost
spec:
  type: ClusterIP
  selector:
    app: ghost
  ports:
    - protocol: TCP
      port: 80
      targetPort: 2368
Step 5: Create an Ingress Resource
Create an ingress.yaml file to route external traffic to Ghost:
apiVersion: networking.k8s.io/v1
kind: Ingress
metadata:
  name: blog-ingress
  namespace: ghost
  annotations:
    nginx.ingress.kubernetes.io/proxy-body-size: 50m
spec:
  ingressClassName: nginx
  rules:
    - host: "yourdomain"
      http:
        paths:
          - path: /
            pathType: Prefix
            backend:
              service:
                name: ghost-service
                port:
                  number: 80
Step 6: Prepare the Kubernetes Environment
First, create the ghost namespace:
microk8s kubectl create namespace ghostThen apply all your YAML files in order:
microk8s kubectl apply -f ./pvc.yaml
microk8s kubectl apply -f ./secrets.yaml
microk8s kubectl apply -f ./deployment.yaml
microk8s kubectl apply -f ./ingress.yaml
Step 7: Configure Nginx for Proper Forwarding
Ghost is designed to have a reverse proxy in front of it. If you use Ghost-CLI to install Ghost, this will be setup for you using nginx. If you configure your own proxy, you’ll need to make sure the proxy is configured correctly.
We need to configure Nginx to use forwarded headers properly.
Edit the nginx-load-balancer-microk8s-conf ConfigMap and add:
data:
  use-forwarded-headers: 'true'
After editing, restart the Nginx ingress controller:
microk8s kubectl rollout restart demonset nginx-ingress-microk8s-controller -n ingressconclusion
In this part you’ve successfully set up a Ghost CMS blog running on microk8s on a Raspberry Pi! Next we'll setup tunnel to receive connection from internet.

![Deploying Ghost CMS on MicroK8s (Raspberry pi) with Public Access via Cloudflare Tunnel [Part 2]](/content/images/size/w720/2025/05/Deploy-Ghost-CMS-on-MicroK8s-1.png)